|
Using Simfatic Forms is extremely easy. You are guided step by step by the wizard, collecting your requirements. Then on press of a button, you can generate all the code and install on your web site.
This 'Getting Started' guide provides a quick introduction to Simfatic Forms.
Step 1: Let's Plan a Simple Form
To start, we will plan a simple feedback form for your web site. Let's suppose we have the following requirements:
- The form should have fields for name, email and comments/feedback.
- There should be validations to check the validity and the size of the input.
- The submitted form data should be sent to an email address (say, myforms@mycompany.com)
'Create a new blank form'
Start Simfatic Forms.
Click on the 'Create New Form' button.

The other options in the first page are for creating form from a template and to read out a form from an existing web page.
When you press on the 'Create a new blank form' button, the wizard screen opens. In this screen, you can see the steps to the left side and the pages in the right side. (See The General Layout of the Wizard)
General form properties
In the general form properties page, you need to provide the basic information of the form. ( See General Form Properties Page for more info. )

- Provide a name 'feedbackform' in the Form name field.
- Press the 'Next' button
Step 2: Add Input Elements
The 'Draw the form' page is for adding input elements to your form.
 Draw the form page
First, we will add the 'Name' field.
Add the 'Name' field
- Press the 'Textbox' button. A text box is added to the form.
- Place the text box by dragging it.
- Double click on the text box to open the properties box for the Textbox.
- Change the name of the field to 'Name'.

- Press the 'Label' button and place the label next to the 'Name' Text box.
- Open the properties box for the label by double-clicking it.
- Change the label text to 'Name'
Add an 'Email' field
- Add a Textbox for the email field just like we added the 'Name' field. (With name and label as 'Email')
Add a 'Feedback' field
- To add a 'Feedback' field, press the 'Multi-line' Text button. A multi-line text box object is placed on the form.
- Double-click on the multi-line text box and change its name to 'Feedback'
- Add a label for the 'feedback' field and change it's label text to 'feedback'

 For 'Name' and 'Email' we chose 'single line' Textbox where as for feedback we expect multi-line input. Thus we added a multi-line box. For 'Name' and 'Email' we chose 'single line' Textbox where as for feedback we expect multi-line input. Thus we added a multi-line box.
Now we have all the elements required for the form ready.
No; oops! We did not add a 'Submit' button!
Add a submit button
Press the button labelled 'Submit button'.
A submit button is placed on the form.
Let' have a 'Preview'
Click on the preview button to have a quick look at your form.

Element Properties
Select an element from the form, right click it and choose 'properties' from the context menu.
Alternatively, select an element from the form, and press Ctrl+Enter to open properties of an element.
Quick sets
The right arrow buttons next to the input elements are for quickly adding commonly used input elements.

This page is to add input validations- checks to ensure that the data input is valid. In the 'Add Input Validations' page, the left side tree displays all the input elements. Select an element from the left; the validations for the selected element appears to the right.
Step 3: Add Validations

Add validations to the 'Name' field
- Select the 'Name' field from the left side box.
- We will make the 'Name' field mandatory. Select the 'Required Field' check box
- Now select the 'size' tab. Select the 'Max Length' check box and provide a maximum value( 40 or 50 ?)
Notice the validation nodes appearing on the left-side tree.
- Select the 'required field' node from the left-side tree.
- On the right side you will see the error message for this validation (the error displayed if this validation fails). You can customize the error message

Validations for the 'Email' field
- Select the 'Email' node from the left side box.
- On the right side, select the 'Required Field' check box, making it a mandatory field
- From the 'Input type' drop down, select 'Email' type
Validations for the 'Feedback' field
We will set a maximum length limit for the feed back field.
- Select the 'Feedback' field from the left side
- Select the 'Maximum Length' check box and enter the Max. limit ( say 10240, ie 10 KB?)
Now, we are ready with the input validations.
Save your work
You can, at any point, save your work to a 'Simfatic Forms project' file. (The file extension is fwz)
- Click on the Save button from the toolbar
- The file dialog pops up. Select the file location and the file name.
Press the Next button to move to the next step.
Step 4: Select Form Processing Options
There are a number of options that you can do with the form submission data. For our feedback form we just want to receive the submitted form data by email.
- Select the 'Send form submission Emails' check box
- Leave all the other options unchecked
- Under 'Troubleshooting', check the 'Debug Mode' option on. This will help in getting detailed errors if the form processing does not work well.
- It will also be good to provide your email address in 'Email address to receive errors' field
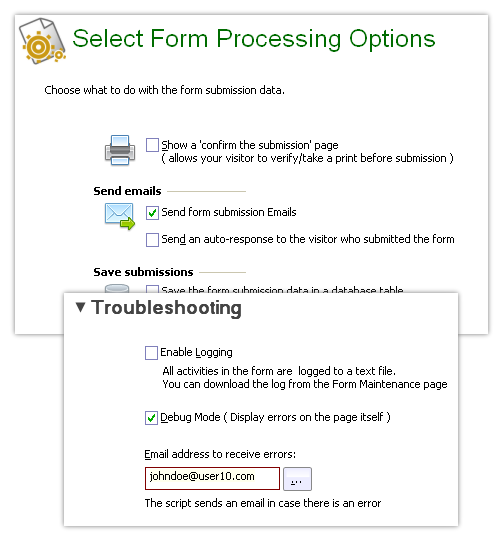
Press the Next button to move to the next step.
When someone submits your feedback form, the form data is composed in to an email and is sent to the configured email addresses.
The Configure Form-mail page lets you configure the email sent when the form is submitted.
Step 5: Edit Email Template
Configure the Recipients
- Press the 'Select...' button next to the 'Recipients' field
- A 'Select Recipients' box opens Press the 'Add' button to add your name and email address to the list. Then choose the address from the list and press OK.

You can add more than one email addresses by following the same procedure.
Editing the Email template
Press the auto-generate button to create an initial template. The auto-generate button opens a 'Field table' box where you can change the order and placement of the fields.
Edit using the Template editor
The in-built HTML editor helps you edit and format the email content. Press the Editor button to open the Template editor.

Field place-holders
You will notice in the auto generated email the field names marked like
%Name% %Email% etc. These are the place-holders for the values entered in the form. If somebody enters 'John Smith' as name, then while processing, %Name% will be replaced with 'John Smith' .
In the editor, you can select a field and press 'Insert Field' button to insert the place-holder for the selected field.
Once you have completed editing, press the 'save' icon and close the editor.
We have completed configuring the form-email. Press the 'Next' button
Step 6: Edit 'Thank you' Page
The "Thank you" page is displayed once the form is submitted successfully. You can configure the response page in this step. After the successful submission of the form, You can either
- Redirect to a URL or
- display a page.

Create the 'Thank You' page template
The quick way to create the 'Thank You' page is to use the 'Auto generate' button. Pressing the 'Auto generate' button generates a sample 'thank you' page.
The other alternatives are:
- Give a URL to redirect to. ( Select the 'URL' radio button and enter the URL ).
- Create and keep a 'Thank you' page. Load the file by clicking the 'Load file' button
You can press the 'Editor' button to open the template editor.
Press Next button to go to the next step
Step 7: Upload the Form
In this step we will install the feedback form on your web site. The 'Take the code' page helps you generate the code and then install the form on your web server.
Press the 'Take the code' button to open the wizard that takes you through the process

Page 1: General
Provide the name of the website where you would like to install the form and press 'Next'
Page 2: Email settings
You can modify the email settings if required. Press 'Next'
Page 3: Generate Code
Press the 'generate code' button to generate the code. After generating the code, Simfatic forms will display a message.
Press 'Next'.
Page 4: Upload Method
There are two ways to upload the form scripts to your website. Either use Simfatic Forms' Swift upload or use manual upload. The Swift upload is recommended because it is easy and safe.
[Note: the rest of the tutorial assumes that you have chosen 'swift upload' method.
Page 5: Swift Upload
First you need to Add your web server to the list. For adding the server, press the 'Add Server' button. It will open a wizard that will collect the login information and the configuration of the web server.
After adding the server, choose the server from the list.
You can change the remote folder if required.
Press the upload button to upload the generated scripts to your web server.
Press the 'Finish' button to close the form installation wizard. Once you have installed the form successfully, you will see more options in the 'Take the code' page.
Press the 'Open form page' button to open the form in your web browser and try it out.
Integrate the form with your web site
You can embed the form in your web pages by copy-pasting the code. Press the 'Copy & Paste Form code' button. It will open a box giving the code for the form. Copy the code from the 'embed the form' tab and paste in your webpage/blog/CMS.
Done!
You have created and installed your first form.
Now you can keep watching the email inbox for new form submissions from your visitors.
Enhancements: adding more features to the form
Once you have successfully installed a simple form, it is easy to add more features to the form.
While making the form in Simfatic Forms, press the 'Save' toolbar button  (or alternatively, the menu item File->Save) to save your form design to a Simfatic Forms project file (The file will have extension .fwz). You can open the Simfatic Forms project file later, add more features and re-install the form again. (or alternatively, the menu item File->Save) to save your form design to a Simfatic Forms project file (The file will have extension .fwz). You can open the Simfatic Forms project file later, add more features and re-install the form again.
This section shows you how to add more features to the feedback form that we had created.
Save the form submission data to a database table
It will be handy to have the form submissions saved to a database table. Let's see how we can have Simfatic Forms do that.
1. Open the Simfatic Forms project File
You should have saved the Simfatic Forms project file for the feedback form.
Open the file using Simfatic Forms.
2. Update the Form Processing Options
- Select the 'Form Processing Options' page.
- Enable the option 'Save the form submission data to a file in the server'
3. Select the fields to save
Press Next button to reach the 'Save to Database' page. You can select the fields to be saved this page. Leave all the fields selected and press the 'Next' button.
4. Install the form again
- Select the 'Take the code' page
- Ensure that the correct server is selected.
- Press the 'Re-Install form' button.
- follow the steps in the 'take the code' wizard
Viewing form submissions
Saving to a database table lets you view the form submissions online.
Switch to the form maintenance page 
Press the Form Admin Page button.
You can view the form submissions in the Admin page (that opens in the browser)
There is an option to download the form submissions too.
Send an auto-response
A visitor comes to your web site; takes time to submit your form. It is a great idea to send a response immediately. Using Simfatic Forms it is very easy to send a personalized auto response.
Update The Form Processing Options
- Open the Simfatic Forms project file that you had saved
- Select the 'Form Processing Options' page.
- Check the option 'Send an auto-response to the visitor who submitted the form'
- Press 'Next' to reach the 'Configure auto-response email' page
Create a response message
You will see 'Name field' and 'Email field' boxes that contains the list of elements in the form.
- For the 'Name field' select the element 'Name'
- For the 'Email field' select the element 'Email'
- Provide the Subject field as Thank you %Name% !
The %Name% will be replaced with the visitor's name when the email is sent.
- Enter the following as the text as the Email content.
Hello %Name%!
Thanks for visiting our website and submitting your feedback.
We will be in touch with you soon!
Regards
Webmaster
Re-install the form
- Select the 'Take the code' page
- Ensure that the correct server is selected.
- Press the 'Re-Install' button.
Test the Form
Submit the form and give your own email address.
Check your email inbox for the auto response!
|